


Call Us
Summary
Programmable smart thermostats, like Nest, offer lots of adjustable features and options for tailoring your HVAC system’s performance to your specific needs. Adding a Nest to your system can provide you with control and information about your system wherever you are, plus make your home more comfortable and energy-efficient. But if you’re new to Nest, you may have some questions about its operation. In this post, we’ll take a look at setting up your Nest for remote access, Nest Sense energy saving options, and scheduling.
Table of Contents
- Settings and Questions
- The Nest Sense Menu
- Setting Up a Schedule
https://www.youtube.com/watch?v=0xQRmXLszAw
Settings and Questions
Nest has a simple interface. Simply press on the thermostat to enter its menus, rotate the dial to select different options, and then press to select. One quirk that sometimes trips up new users is the lack of a “Back button.” If you find yourself searching the wrong menu and want to exit, simply look for the “Done” option and select it This will take you out of the menu that you’re currently in.
Understanding the Physical Controls
The Nest thermostat screen is NOT touch-enabled. All control happens through the physical ring around the display:
- Turn the ring LEFT (counter-clockwise) to lower the temperature
- Turn the ring RIGHT (clockwise) to raise the temperature
- Press the ring IN (like a button) to access the Quick View menu
- In menus, turn the ring to scroll through options
- Press in again to select the highlighted option
- Look for the back arrow icon to exit menus - turn ring to highlight it, then press in
Quick View Menu: This is the main menu you see when you press the thermostat. Different Nest models may display different icons here. Common icons include:
- Calendar icon: Scheduling
- Gear icon: Settings
- Squiggly lines icon: Switch between heating and cooling
- Stopwatch icon: Temperature history
Setting up Nest for Remote Access
Remote access is one of the coolest features of Nest. When you’ve set up remote access, you can monitor and control the thermostat from the Nest app, opening up a whole range of options. To set up your Nest for remote access, you’ll need to connect it to your home’s Wi-Fi system.
- Install the Nest app on your phone. You’ll need to create a Nest account or log in if you already have one.
- On your thermostat, select Settings, then rotate to Nest App.
- On your phone, select Add Product on the Nest app.
- Allow the Nest app to access your phone’s camera, then select QR Code on the thermostat. Scan the QR code.
- Select Start Installation.
- Nest will search for Wi-Fi networks. Select yours and enter the password.
- Now select the room where your nest is installed from the options presented and complete the setup.
Important App Setup Notes:
You must have physical access to your thermostat to pair it with the app - you cannot pair it remotely.
Alternative pairing method if QR code doesn't work:
- On thermostat: Settings > Nest App > Get Entry Key
- In app: Settings > Add Product > Continue without scanning
- Enter the entry key when prompted
Download locations:
- Apple users: Apple App Store
- Android users: Google Play Store
Account creation is free and requires only an email address and password.
The Nest Sense Menu
One of the main features of Nest is the Nest Sense Menu. Here you’ll find a collection of settings that will make Nest helpful, make your home more comfortable, and also help you save energy and money.
Auto-Schedule
What if your thermostat could learn by what you do? Auto-Schedule does just that. For example, if you turn the temperature down at night for sleeping, Auto-Schedule will pick up on your habits and program Nest to automatically drop the temperature. Auto-Schedule is optional. To enable it, choose Auto-Schedule from the Nest Sense menu and select Yes or No.Time to Temperature
With Time to Temperature selected, the thermostat will display how long it will take to achieve the desired temperature in your home.Early On
When you enable Early On, Nest will preheat or precool your home to achieve the desired temperature at the time you’ve scheduled. If, for example, you’ve set your schedule to 70 degrees at 7 AM, Nest will begin heating or cooling your home so that your temperature is at 70 right at 7 AM.Cool to Dry
If you live in a humid climate, you might want to try out Cool to Dry. This feature uses your air conditioner to pull excess moisture out of the air. That not only makes your home more comfortable, but it can prevent the growth of mold in your home.Sunblock
Does sunlight fall on your thermostat during the day? That can make the thermostat’s readings inaccurate. Sunblock takes solar radiation into account so you get a more accurate temperature reading.Leaf
The Leaf feature lets you know when you’re doing a good job at conserving energy. Anytime your thermostat settings improve the energy efficiency of your system, the Leaf icon will appear on the Nest display.Airwave
Airwave improves the efficiency of your AC unit by keeping the blower fan on for a short time after the AC shuts off, circulating the residual cool air in the system throughout your home.
Additional Settings Available:
Lock: Allows you to lock the thermostat so no unauthorized changes can be made. This is particularly useful for households with children, shared living spaces, or rental properties where you want to maintain temperature limits.
Reminders: Set helpful reminders for routine maintenance tasks like changing your air filter (typically every 1-3 months), scheduling annual HVAC tune-ups, or other system maintenance. These proactive reminders help prevent problems before they become expensive repairs.
Brightness: Adjust the display brightness to your preference. You can set it to automatically dim at night or keep it at a consistent brightness level.
Farsight: Customize what information displays on the home screen when you approach the thermostat. Options include current temperature, target temperature, weather, or analog clock display.
Note: Different Nest models (standard Nest Thermostat, Nest Learning Thermostat, and Nest Thermostat E) have different settings and features available. The Nest Learning Thermostat offers the most comprehensive feature set.
Setting Up a Schedule
One of Nest’s most attractive features is how easy it makes it to set up a schedule or your HVAC system. As with most of Nest’s functions, you can use your connected smartphone or other devices to set up a schedule, but it’s also easy to do directly from the thermostat.
- Start by pressing anywhere on the thermostat.
- Turn the knob until you reach the calendar icon on the bottom right. Press to enter the schedule.
- Move forward or backward on the schedule by rotating the Nest’s dial.
- When you reach a time where you want to set a temperature, press in and select New.
- Turn the knob to adjust the time by 15-minute intervals.
- Press in to set the temperature. Rotate clockwise to raise the temperature, counter-clockwise to lower it.
- When you are satisfied, press in to confirm your choice.
- When you’re done, scroll to the right or left to exit scheduling.
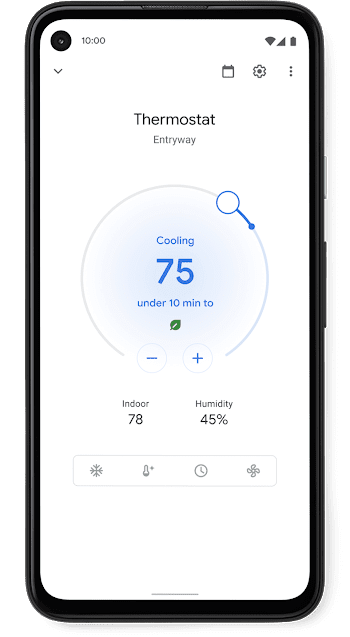
Using the Nest App for Complete Control
The Nest app gives you full remote control of your thermostat from anywhere you have internet access. Here's how to maximize the app's features:
Changing Temperature via the App:
Open the Nest app and select your thermostat from the home screen. You'll see a digital version of your physical thermostat. To adjust temperature:
- Move your finger around the temperature circle (just like turning the physical ring)
- OR tap the up and down arrows below the temperature display
- Changes take effect immediately and sync with your physical thermostat
Scheduling from the App:
The app makes scheduling even easier than the physical thermostat:
- Open the app and select your thermostat
- Tap the calendar icon
- Choose the day you want to schedule
- Tap the "Add" button to create a new temperature setting
- Move the temperature up and down to set your desired level
- Drag the time slider left or right to adjust when this temperature should activate
- Tap "Done" to save
To remove a scheduled temperature: Tap "Remove," then tap the scheduled temperature you want to delete.
Adjusting Settings in the App:
All settings available on the physical thermostat can also be changed through the app:
- Open the app and select your thermostat
- Tap the gear icon in the top right corner
- Scroll through the settings menu
- Tap any setting you want to modify
- Make your changes and they'll sync automatically
The app interface mirrors the physical thermostat, making it intuitive to navigate once you understand one or the other.
Home/Away Detection & Eco Temperatures
One of Nest's smartest features is automatic home/away detection:
Location Tracking: The Nest thermostat tracks your phone's location to automatically determine when you're home or away. When you leave, it switches to "Eco Temperature" mode to save energy and money. When you return, it adjusts back to your comfort settings without you lifting a finger.
Eco Temperature Settings: You can customize what temperature range Nest uses when you're away. This ensures energy savings while preventing extreme temperatures that could damage your home or belongings.
Home/Away Assist: Found in Settings, this feature lets you:
- Set the temperature for when you're not home
- Tell the thermostat to turn off completely when you leave
- Adjust how sensitive the away detection is
- Add multiple users' phones for more accurate detection
Manual Override: You can always manually switch between Home and Away modes if the automatic detection doesn't fit your needs on a particular day.
Temperature History & Energy Reports
Stopwatch Icon (Temperature History): In the Quick View menu, select the stopwatch icon to view your temperature history. This feature shows:
- Temperature patterns over time
- When your system was heating or cooling
- How long it took to reach target temperatures
- Use this data to optimize your schedule based on actual usage patterns
Energy Usage Tracking: The Nest thermostat tracks your daily energy usage and reports it to you through the app, allowing you to:
- See exactly how much energy you're using each day
- Compare usage across different months
- Identify opportunities to save more money
- Track the impact of schedule changes on your energy consumption
Energy Savings & Payback Period
Proven Energy Savings: Studies show that installing a Nest Learning Thermostat produces average savings of:
- 10-12% on heating bills
- 15% on cooling bills
This means the thermostat could pay for itself within just two years based on energy savings alone.
ENERGY STAR Certified: The Nest Learning Thermostat is the first ENERGY STAR-certified smart thermostat, meeting rigorous efficiency standards set by the EPA. This certification guarantees that the device has been independently verified to deliver real energy savings.
Long-term Value: Beyond the initial payback period, you'll continue saving money year after year. Over a 10-year lifespan, these savings can add up to thousands of dollars, depending on your usage patterns and local energy costs.
Nest Model Comparison
Understanding which Nest model is right for you:
Nest Learning Thermostat (3rd Generation)
- Auto-Schedule learning capability
- Farsight feature (displays info from across the room)
- Works with most 24V systems
- Premium metal finish
- All Nest Sense features included
- Largest, brightest display
- Best for: Homeowners who want the most advanced features and auto-learning
Standard Nest Thermostat
- Manual scheduling (no auto-learning)
- Essential Nest features
- Works with most 24V systems
- More affordable price point
- Programmable and remote-controllable
- Best for: Budget-conscious buyers who don't need auto-learning
Nest Thermostat E
- Frosted display (blends into walls)
- Simplified interface
- Works with most low-voltage systems
- Most affordable option
- Scheduling in Settings menu (not Quick View)
- Fewer features than Learning Thermostat
- Best for: Renters or those wanting basic smart control
All models work with the Nest app and provide remote access when connected to Wi-Fi.
Installation & Compatibility
Installation Time: Basic installation takes approximately 30 minutes following the manual instructions. Most homeowners with basic DIY skills can complete the installation themselves.
Professional Installation: For professional installation, same-day service is often available. Team Enoch offers same-day Nest installations throughout the Dallas-Fort Worth area.
Compatibility: The Nest thermostat works with most 24V HVAC systems, including:
- Gas, electric, and oil heating systems
- Central air conditioning
- Heat pumps (with or without auxiliary heat)
- Radiant heating systems
- Forced air systems
Important: Compatibility should be verified before purchase, especially for older systems or systems with unusual configurations. The Nest website offers a compatibility checker, or you can consult with an HVAC professional.
C-Wire Requirement: Some systems may require a C-wire (common wire) for continuous power. If your system doesn't have one, installation may require a power adapter or professional wiring modifications.
Troubleshooting Common Issues
System Alerts: The Nest thermostat offers proactive alerts to help with troubleshooting, such as:
- Notifications when filters need replacement
- System error warnings
- Connectivity issues
- Low battery alerts
- These alerts help prevent problems before they become expensive repairs
Common Problems & Solutions:
Wi-Fi Connectivity Issues:
- Check that your Wi-Fi password was entered correctly
- Ensure your thermostat is within range of your router
- Restart your router and thermostat
- Check if other devices can connect to your Wi-Fi
Battery Charging Problems:
- The Nest charges from your HVAC system's power
- If battery is low, check wire connections
- May indicate C-wire is needed
- Leave system on for several hours to allow charging
Temperature Readings Seem Off:
- Enable Sunblock if direct sunlight hits the thermostat
- Ensure thermostat isn't near heat sources (lamps, appliances)
- Check that vents aren't blocked near the thermostat
- Consider relocating the thermostat if problem persists
App Won't Connect:
- Verify thermostat is connected to Wi-Fi
- Check that your phone has internet access
- Try logging out and back into the app
- Unpair and re-pair the thermostat if needed
When to Call a Professional:
- Thermostat won't power on at all
- HVAC system isn't responding to commands
- Error codes appear repeatedly
- Installation seems to have caused system problems
- You need a C-wire installed
Integrating with Other Nest Products
Create a Complete Smart Home Ecosystem:
Nest Cam (Indoor & Outdoor)
Weatherproof outdoor monitoring provides 24/7 surveillance day or night. Indoor cameras are perfect for watching pets or children, even when you're not in the room. Features include:
- 1080p HD video with night vision
- Two-way audio communication
- Motion and sound alerts sent to your phone
- 24/7 live streaming
- Person detection alerts
- All cameras integrate seamlessly with the Nest ecosystem
Nest Protect (Smart Smoke + CO Alarm)
Instead of just blaring an alarm, Nest Protect provides actionable information to keep you safe:
- Speaks to tell you what the danger is and where it is
- Sends alerts to your phone about rising CO levels or smoke detection, even when you're away
- Tests itself automatically and alerts you to any issues
- Pathway lighting guides you in the dark
- Works with Nest Thermostat to shut off HVAC if CO is detected
Unified Control
All Nest products work together through the same app, giving you complete smart home control from one interface:
- See all devices in one place
- Create routines (e.g., "leaving home" adjusts temperature and arms cameras)
- Receive coordinated alerts
- Voice control through Google Assistant
Ready to Step Up to a Nest?
Smart learning thermostats like Nest are here, and they offer you plenty of cool ways to make your home’s HVAC system work for you. If you don’t already have a Nest or other smart thermostat, learn more about how we can get you set up with the latest smart home technology to control your HVAC system. If you're in the Dallas Fort Worth area Contact us today about all your HVAC needs, remember, estimates are always free!
About Us
How to Prevent AC Compressor Failure: 7 Warning Signs You Can't Ignore
May 5, 2026
The Hidden AC Problem That Can Shut Down Your Entire System
January 8, 2026
Musty Smell When AC Turns On? Here's What's Lurking in Your System
June 8, 2026
Why Your AC Is Set to 72 but Still Feels Like 78, And How to Fix It
March 23, 2026
Common HVAC Sales Scams and How to Avoid Them
May 5, 2026
14 SEER vs. 16 SEER: Which AC Rating Is Best for Your Home?
July 4, 2026
Blown-In Attic Insulation: Cut Energy Bills in Texas and Florid
June 25, 2026
How to Clean AC Evaporator Coils Inside Your House (Without Removing Them)
June 25, 2026
How Often Does an HVAC System Need Refrigerant?
June 22, 2026
Aux Heat Running Too Much? What It Is & How to Fix It
June 16, 2026