


Your AC compressor is the heart of your cooling system. When it fails, you're looking at repair costs between $1,200 and $2,800, often enough to justify replacing the entire system instead of just the compressor. For homeowners with systems over 10 years old, compressor failure typically means complete system replacement costing $5,000–$10,000.
But here's what most homeowners don't realize: compressor failure rarely happens without warning. The signs appear weeks or even months before catastrophic breakdown. Most compressors don't just die suddenly, they give you clear signals that something is wrong if you know what to look for.
According to research on HVAC component failure patterns, with proper maintenance a high-quality AC compressor typically lasts between 10 to 15 years. Neglecting filter changes and annual tune-ups can shorten this lifespan significantly, with many compressors failing at 7–9 years instead of 12–15. The difference between these outcomes often comes down to recognizing warning signs early and addressing them before they cascade into complete failure.
This guide explains the seven warning signs of impending compressor failure, what causes compressors to fail prematurely, how to prevent damage through proper maintenance, and when repair makes sense versus when replacement is the smarter choice.
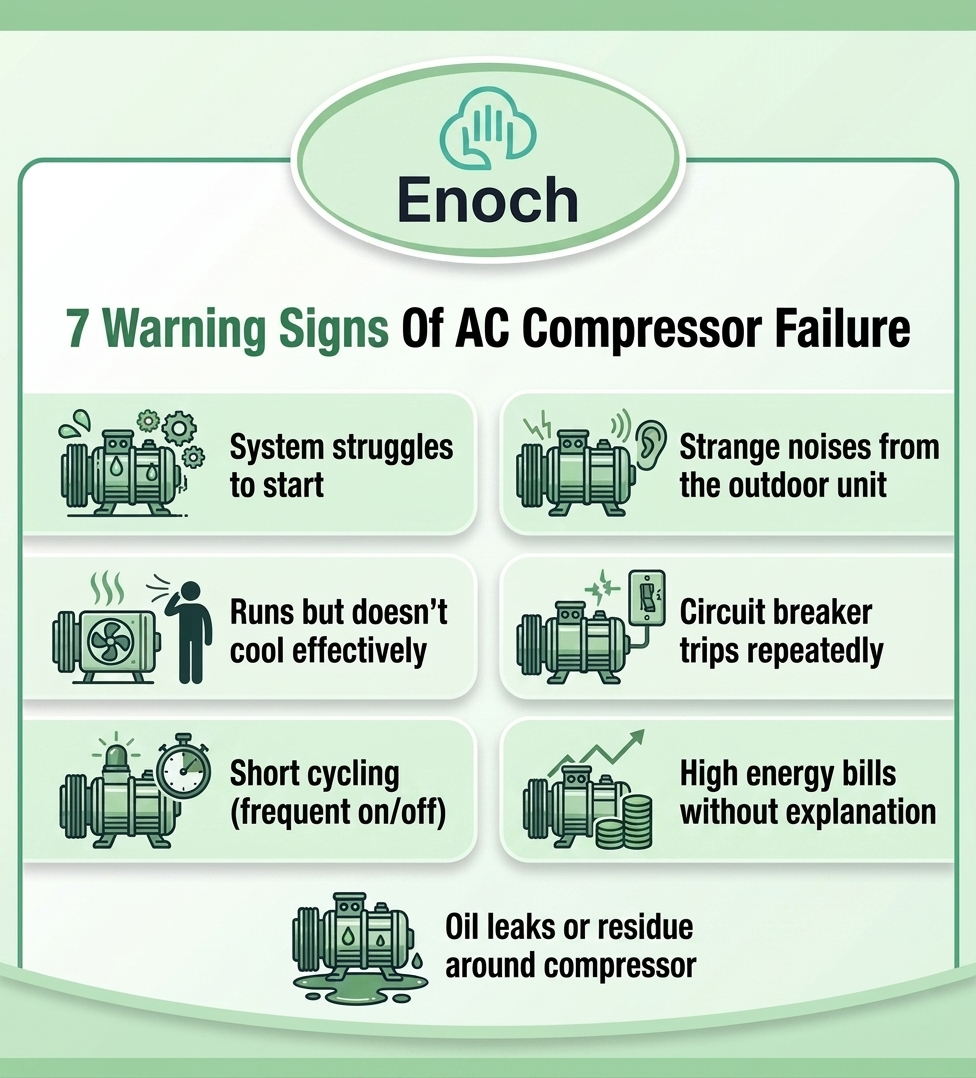
Warning Sign #1: The System Struggles to Start
What You'll Notice:
- Compressor tries to start but struggles, making repeated clicking sounds
- Lights dim slightly when the AC attempts to start
- Unit makes a loud humming sound but doesn't actually start cooling
- Takes multiple attempts before the compressor engages successfully
What's Happening:
A compressor that struggles to start is experiencing what's called "hard starting." The electric motor that drives the compressor is having difficulty overcoming the initial resistance to get the compressor moving. This happens when the starting capacitor weakens, when electrical connections degrade, or when mechanical wear inside the compressor increases friction.
Every hard start places extreme stress on the compressor motor windings. The motor draws significantly higher current trying to overcome the resistance, sometimes 600-800% of normal running amperage. Over time, this excessive current degrades the motor windings, eventually leading to complete motor burnout.
What to Do:
Have a licensed technician test the starting capacitor using a multimeter. Capacitors weaken gradually over time and are designed to be replaced periodically. A failing capacitor costs $75–$200 to replace. A compressor motor that burns out from repeated hard starts costs $1,200–$2,800 to replace. The choice is obvious, replace the capacitor before it destroys the compressor.
Warning Sign #2: Strange Noises Coming From the Outdoor Unit
What You'll Notice:
- Grinding or scraping sounds: Metal-on-metal contact inside the compressor
- Loud banging or clanking: Internal components loose or damaged
- High-pitched squealing: Bearings wearing out or belt (on older systems) slipping
- Hissing or bubbling sounds: Refrigerant leak or internal pressure problems
What's Happening:
Compressors contain precisely machined internal components, pistons, valves, bearings, that move thousands of times per minute under high pressure. When these components wear or when lubrication breaks down, metal surfaces contact each other directly, creating grinding or scraping sounds.
Banging sounds indicate mechanical components have broken loose or fractured inside the compressor housing. This often results from prolonged operation with damaged reed valves (which control refrigerant flow direction) or from liquid refrigerant entering the compressor instead of vapor, a condition called "liquid slugging" that can bend connecting rods and crack valve plates.
What to Do:
Turn off the system immediately if you hear grinding, banging, or loud metal-on-metal contact. Continued operation accelerates damage and can cause complete mechanical failure. Contact a licensed technician for diagnosis before attempting to restart the system.
For minor squealing or hissing sounds, schedule service within a few days. These indicate developing problems that will worsen but haven't reached critical failure yet.
Warning Sign #3: The Unit Runs But Doesn't Cool Effectively
What You'll Notice:
- Compressor runs (you hear it operating) but indoor temperature doesn't drop
- System runs continuously but never reaches thermostat setpoint
- Air from vents feels only slightly cooler than room temperature
- Outdoor unit runs but doesn't feel hot to the touch as it normally does
What's Happening:
A compressor that runs but doesn't produce adequate cooling has lost its pumping capacity. This happens when internal valves (reed valves) wear out or break, allowing high-pressure refrigerant to leak back into the low-pressure side during compression.
According to technical documentation on compressor performance, an HVAC compressor should be able to pull at least 15 inches of vacuum against 100 psi head pressure to be considered efficient. When reed valves fail or when internal wear creates excessive clearances, the compressor can't maintain this pressure differential.
The result: the compressor motor spins and makes noise, using electricity continuously, but it's not effectively moving refrigerant through the system. The system appears to be running but delivers little to no cooling.
What to Do:
This symptom requires professional diagnosis to distinguish between a failing compressor and other issues like refrigerant leaks or expansion valve problems. A technician will measure suction and discharge pressures to determine if the compressor is producing adequate pressure differential.
If the compressor has lost pumping capacity from internal wear, replacement is the only solution. This is not a repair, compressor internals cannot be rebuilt in residential applications.
Warning Sign #4: Circuit Breaker Trips Repeatedly
What You'll Notice:
- Breaker trips immediately when AC starts
- Breaker trips after system runs for a few minutes
- Breaker trips randomly during operation
- Resetting breaker allows temporary operation before tripping again
What's Happening:
Circuit breakers trip when electrical current exceeds the breaker's rated capacity. A compressor drawing excessive current indicates:
Electrical short inside the compressor motor: Motor windings have deteriorated and shorted to ground or to each other, causing excessive current flow that triggers the breaker.
Seized or mechanically locked compressor: If internal components have seized from lack of lubrication or mechanical damage, the motor draws extreme current trying to turn the locked compressor.
Failing start/run capacitor: A bad capacitor forces the motor to draw higher current during startup and operation, sometimes enough to trip the breaker.
Bad contactor: The contactor is the relay that switches power to the compressor. When contactor points become pitted or burned, they create electrical resistance that generates heat and can cause breaker trips.
What to Do:
A breaker that trips repeatedly when the AC runs is a safety mechanism preventing electrical fire or motor damage. Do not bypass the breaker or install a higher-rated breaker — this removes the safety protection and creates fire hazard.
Call a licensed technician immediately. They'll measure compressor amp draw and test electrical components to identify the cause. If the compressor motor itself has shorted, replacement is required.
Warning Sign #5: System Short-Cycles (Turns On and Off Frequently)
What You'll Notice:
- System turns on, runs for 3-7 minutes, then shuts off
- Cycles repeat every few minutes throughout the day
- Never runs long enough to adequately cool the home
- Short bursts of operation rather than normal 15-20 minute cycles
What's Happening:
According to manufacturer specifications documented by companies like Trane, HVAC systems enforce a minimum run time of 3 minutes and a minimum off time of 5 minutes with compressor operation. The shortest healthy cycle should be approximately 7 minutes total. Systems cycling faster than this are short-cycling.
Short-cycling damages compressors because every startup generates electrical and mechanical stress far exceeding normal operation. The compressor motor draws 6-8 times normal running current during each start. Frequent starts accumulate this stress rapidly, degrading motor windings and mechanical components.
Short-cycling has multiple causes:
- Oversized system: Unit is too large for the space, cools too quickly, satisfies thermostat prematurely
- Low refrigerant: System can't absorb heat properly, runs briefly then shuts off on safety limits
- Dirty evaporator coil: Restricted airflow causes coil to freeze, system shuts down, thaws, restarts
- Failing thermostat: Erratic temperature sensing creates random on/off signals
- Electrical problems: Bad capacitor, contactor, or control board causing erratic operation
What to Do:
Short-cycling requires professional diagnosis to identify the root cause. Don't ignore it, every short cycle accelerates compressor wear. Research indicates that compressors fail 20-30% sooner when subjected to constant short cycling based on field performance data.
A technician will check refrigerant charge, measure airflow, test electrical components, and verify proper system sizing to determine why the system won't run normal cycles.
Warning Sign #6: High Energy Bills Without Explanation
What You'll Notice:
- Electric bills suddenly increase 20-30% or more
- Usage increases despite similar weather and household patterns
- System appears to run more frequently or longer than previous seasons
- Gradual bill increases over several months
What's Happening:
A failing compressor loses efficiency progressively. As internal components wear, valve plates deteriorate, piston rings develop clearance, bearings loosen, the compressor must run longer to produce the same cooling output.
Additionally, when compressors begin failing they often draw higher electrical current due to increased mechanical friction or partial motor shorts. You're paying for more electricity to produce less cooling.
What to Do:
Compare current summer bills to the same months from previous years, adjusting for rate changes. A 15-20% increase without corresponding temperature increases suggests equipment efficiency loss.
Have a technician measure amp draw and compare to the compressor's nameplate ratings. Electrical current significantly above rated amperage indicates problems. They can also measure system performance, how much cooling the system produces per watt of electricity consumed, to determine if efficiency has degraded.
Warning Sign #7: Oil Leaks or Residue Around the Compressor
What You'll Notice:
- Dark oil spots on the concrete pad under the outdoor unit
- Oily residue on compressor housing or refrigerant lines
- Combination of oil and refrigerant (appears as dark greasy substance)
- Oil stains spreading over time
What's Happening:
Compressors contain oil that lubricates internal moving parts. This oil circulates through the refrigerant system along with the refrigerant itself. Oil should never escape from a properly functioning sealed system.
When you see oil outside the system, it indicates:
Refrigerant leak: Refrigerant and oil escape together through cracks, loose connections, or corroded components. The refrigerant evaporates quickly but oil residue remains visible.
Compressor seal failure: Mechanical seals on rotating components have failed, allowing oil to escape.
Severe internal damage: If the compressor has catastrophically failed internally, oil can be forced out through compromised seals or cracked housing.
What to Do:
Oil leaks combined with inadequate cooling almost always indicate serious compressor or system problems. Have the system inspected immediately. If refrigerant has leaked out along with the oil, the compressor may have been running without adequate lubrication, causing internal damage.
A technician will locate the leak source, determine if refrigerant charge is adequate, and assess whether compressor damage has occurred. Simply adding refrigerant without addressing the leak and evaluating compressor condition sets you up for repeated failures.
What Actually Causes Compressor Failure
Understanding what damages compressors helps prevent failure through proper maintenance and operation.
Cause #1: Dirty or Restricted Airflow
How It Causes Failure:
According to manufacturer guidance, a clogged air filter restricts airflow, causing the system to overheat and the compressor to work harder than necessary, eventually leading to burnout. With proper maintenance, compressors last 10-15 years. Neglecting filter changes shortens this significantly.
When airflow is restricted by dirty filters, blocked return vents, or dirty evaporator coils, the system can't absorb heat effectively. The compressor continues running, working harder and harder trying to achieve the desired cooling, but the heat exchange process is compromised.
Additionally, restricted airflow can cause the evaporator coil to freeze. Ice blocks heat transfer entirely. When the ice melts, liquid refrigerant can flood back to the compressor, a condition called "floodback" or "liquid slugging" that mechanically damages compressor internals.
Prevention:
- Replace air filters every 30-60 days during cooling season
- Keep return vents clear and unobstructed
- Have evaporator coils professionally cleaned annually
- Never close more than 25% of supply vents throughout the home
Cause #2: Low Refrigerant from Leaks
How It Causes Failure:
According to documentation on refrigerant system failures, low refrigerant levels or leaks force the compressor to work harder than it should. Over time, that stress leads to burnout or mechanical failure.
Low refrigerant reduces cooling capacity, causing the system to run longer cycles trying to achieve setpoint. Extended runtime accumulates operating hours faster, accelerating wear.
More critically, low refrigerant causes the compressor to run hotter than designed. Refrigerant vapor entering the compressor normally helps cool the motor windings. When refrigerant charge is low, this cooling effect diminishes and motor temperatures rise. Sustained overheating degrades motor winding insulation, eventually causing electrical shorts and motor burnout.
Prevention:
- Address refrigerant leaks immediately — don't just "top off" the charge
- Have refrigerant pressures checked during annual maintenance
- Watch for ice formation on refrigerant lines (indicates low charge)
- Understand that refrigerant is in a sealed system — if it's low, there's a leak
Cause #3: Electrical Problems
How It Causes Failure:
Electrical issues damage compressors through:
Voltage fluctuations: Power surges or voltage sags stress motor windings. Compressor motors are designed for specific voltage ranges (typically 208-230V for residential systems). Sustained operation outside this range causes overheating and premature failure.
Bad capacitors: Start capacitors and run capacitors provide electrical boost for startup and operation. When these fail, the compressor motor draws higher current and struggles to operate efficiently, accelerating winding degradation.
Poor connections: Corroded, loose, or damaged electrical connections create resistance that generates heat and reduces voltage reaching the compressor. The motor compensates by drawing higher current, which accelerates wear.
According to technical resources on compressor burnout, when a compressor motor catastrophically fails, the oil becomes extremely acidic. If all this acid is not removed when the compressor is replaced, the high acid levels will attack the new compressor and cause another motor burnout in a short period of time.
Prevention:
- Have capacitors tested annually and replaced every 5-7 years as preventive maintenance
- Ensure electrical connections are tight and free of corrosion
- Consider whole-house surge protection to prevent voltage spike damage
- Address flickering lights or voltage issues before they damage HVAC equipment
Cause #4: Lack of Maintenance
How It Causes Failure:
Research on HVAC maintenance indicates that things such as moisture, non-condensables, and overheating are preventable causes of motor burnout. Proper evacuation and charging and proper system maintenance (replacing filters, cleaning condensers, and properly adjusted controls) will prevent many burnouts from occurring.
Systems that never receive professional maintenance accumulate multiple small problems that compound:
- Dirty coils restrict heat transfer
- Worn electrical components draw excessive current
- Refrigerant charge drifts from design specifications
- Drainage systems clog, causing water damage
- Control systems drift out of calibration
Each problem individually might not kill a compressor immediately. But the cumulative effect of multiple unaddressed issues creates operating conditions that dramatically shorten compressor life.
Prevention:
- Annual professional maintenance before each cooling season
- Bi-annual service for systems over 10 years old or in harsh climates
- Address any performance issues immediately rather than letting them worsen
- Keep service records to document maintenance history (important for warranty claims)
When Repair Makes Sense vs. When Replacement Is Smarter
Compressor replacement is expensive enough that it often triggers the "repair vs. replace" decision for the entire system. Here's how to think through that choice.
Repair the Compressor If:
- System is less than 7 years old
- System has been well-maintained with service records
- Compressor failure is covered under manufacturer warranty (parts covered, you pay labor)
- No other significant system problems exist
- Home cooling needs haven't changed since installation
- Repair cost is less than 50% of replacement cost
Replace the Entire System If:
- System is 10+ years old
- Compressor uses R-22 refrigerant (being phased out, increasingly expensive)
- Multiple other components are showing wear (fan motor, coils, controls)
- Repair cost exceeds 50% of new system cost
- System was improperly sized from the beginning
- You want to upgrade efficiency (new systems are 30-50% more efficient than systems from 2010)
The "50% Rule" is standard industry guidance: if the repair cost exceeds half the cost of new equipment, replacement is usually the smarter financial choice.
For example: $1,800 compressor replacement on a 12-year-old system vs. $5,500 complete system replacement. The compressor repair is tempting because it costs less upfront. But the system is likely to need additional repairs within 2-3 years (fan motor, capacitors, coils). The old system also uses R-22 refrigerant that's increasingly expensive for future repairs. The new system is 40% more efficient, saving $300-$500 annually on energy costs.
Total 5-year cost of repair path: $1,800 (compressor) + $800 (likely future repairs) + $0 energy savings = $2,600 Total 5-year cost of replacement: $5,500 - $1,500 (energy savings over 5 years) = $4,000 net
The numbers favor replacement when you look beyond the immediate repair cost.
Compressor failure doesn't happen overnight. The warning signs appear weeks or months before catastrophic breakdown, strange noises, hard starting, short-cycling, weak cooling, high bills, circuit breaker trips, and oil leaks all indicate developing problems.
Catch these signs early and you can often prevent complete failure through repairs that cost $150-$400. Ignore them and you're facing $1,200-$2,800 compressor replacement or $5,000-$10,000 full system replacement.
The compressor is the single most expensive component in your HVAC system. Protecting it through proper maintenance, prompt filter changes, and immediate attention to warning signs is the difference between a system that lasts 12-15 years and one that fails at 8.
Monthly air filter changes, annual professional maintenance, and watching for the seven warning signs covered in this guide give you the knowledge to prevent expensive compressor failures and extend your system's operational life to its full design potential.
Professional AC Diagnosis and Compressor Service
Team Enoch serves homeowners across Dallas-Fort Worth, Arlington, Austin, San Antonio, and Houston with professional HVAC diagnosis, compressor replacement, and preventive maintenance. Our licensed technicians (TACLB#00086312C) use calibrated diagnostic equipment to accurately identify compressor problems and provide honest recommendations about repair versus replacement.
If your system is showing any of the warning signs discussed in this guide, we can diagnose the issue and explain your options clearly. Sometimes a $200 capacitor replacement prevents a $2,000 compressor failure. Sometimes compressor replacement makes financial sense. Sometimes full system replacement is the smarter investment.
We'll give you the facts, the costs, and our professional recommendation, then let you make the decision that's right for your situation and budget.
Call us at 817-769-3712 or schedule online at teamenoch.com
Ask Us Anything
FAQs
About The Author

Rizwan Ahmed
Website Manager

About Us
July 27, 2026
The Truth About AC Burnouts: It's Usually Not the Brand
April 10, 2026
9 Common Texas HVAC Problems and How to Fix Them
December 4, 2025
Can Mold in Air Ducts Make You Sick? Health Effects Explained
July 17, 2026
Why Is My House So Humid Even With the AC On?
July 17, 2026
Are All Stop Valves Created Equal?
September 16, 2025
Year-Round Home Maintenance Checklist 2026
December 16, 2025
How to Prevent AC Compressor Failure: 7 Warning Signs You Can't Ignore
May 5, 2026
The Hidden AC Problem That Can Shut Down Your Entire System
January 8, 2026
Musty Smell When AC Turns On? Here's What's Lurking in Your System
June 8, 2026